DEPTH PHOTOS

This is a two-picture photo assignment-Photo Assignment 1 should show great depth of focus, Photo Assignment 2 should show shallow depth of focus.

In other words make two images that show how f:stop and lens focal length affect depth of field or focus.

EXAMPLE:  The chess pieces (top) shot with a small aperture such as f:22 appear in focus from front to back. The other photo (bottom) shows focus on the first chess piece while the pieces in the background are out of focus due to the shallow depth of field (F:2.8)

depth & motion two-Part shutter speed & f:stop Assignment


GREATER DEPTH OF FOCUS

A small aperture and maximum depth of focus create an image where all the chess pieces are sharp or in focus.


SHALLOW DEPTH OF FIELD or FOCUS

Shallow depth of focus achieved using f:stop only. The front chess piece is in focus and pieces in the background appear out of focus.

MOTION PHOTO 2- BLUR MOTION

BLUR MOTION & PAN ACTION

Camera note: If you have an “S”  (Shutter Priority) or “TV” (Time Value) setting on your camera you may be able to use this feature to choose your shutter speed and have the camera automatically set the appropriate f:stop for a correct exposure.

The Motion Blur photo is taken at a slow shutter speed such as 1/30th of a second or slower. It’s common in dark areas to use a slow shutter speed in order to make a good exposure. Motion in the picture can result even if you use a tripod if the subject of your photo is moving.

PAN ACTION PHOTO

For the pan-action photo set your camera to a show shutter speed 1/60th of a second, or slower, and shoot someone as they move,  panning or moving your camera along with your subject’s direction of travel---taking the photo while the camera is moving.

This is going to take some trial and error to get a good result, so be sure to shoot plenty of photos in order to get a good one for your portfolio. You may also try holding the camera still while you photograph a person or object in motion, causing the subject to have motion but the background to be sharp or motionless.


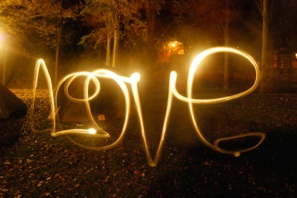
PAINTING WITH LIGHT


Use a tripod, put your camera on a tabletop or use a bean bag to steady the camera and frame the area, person or object to want to paint. Gather a couple of different flashlights if possible of varying sizes and intensity. Use colored gels over the flashlights if possible. Remember that the closer you get to the subject with the flashlight the more exposure/lighting it will provide.

Wear dark clothes and keep moving if you don’t want to show up in your photos. It’s OK if you are the subject in the photo and use the flashlight to draw your outline, spell a word or illuminate yourself.

If you use a human subject try to have them in a comfortable position that they can remain

motionless during the length of the exposure.


.


HOW-TO -GREAT DEPTH OF FOCUS

 Use the Minimum (smallest) Aperture and your lens set to wide angle.  

Set the f:stop of your camera to the minimum aperture (ex: f:22). The minimum f:stop varies from camera to camera. Its sometimes confusing, but minimum aperture refers to the bigf:stop numbers like f:22. Your point and shoot MAY have a minimum aperture of only f:8. (the small opening, like the pupil of your eye opened to its minimum size outside in bright sun) Again, this varies according to the camera that you have. So in order to get the maximum depth of focus with your camera you should set the f:stop to f:8 (or the smallest aperture or biggest number available) then set the  shutter speed accordingly to give you a proper exposure.

Zoom your lens to its most WIDE-ANGLE setting in order to get the greatest depth of focus. Remember, the focal length of the lens plays a part in depth of field. The wider the lens the more inherent depth of field/focus you will have.

In order to enhance apparent depth of focus arrange your subjects with foreground and background separation.  Foreground/Background juxtaposition gives a more three-dimensional look. Learn to position yourself in such a way so the main subject is in the foreground close to the camera, with a background that adds to the picture or helps tell the story.

Camera note: If you have an “A”  (Aperture Value) or “AV”  (Aperture Value) on your camera you may be able to use it to set the camera to its maximum (f:2.8 or larger) aperture for the first shot and to the minimum aperture (f:8 or smaller) for the second greater depth of focus image

The impact of Shutter Speed and f:stop, a photo assignment in FIVE parts.

Your camera’s shutter speed (ex: 1/500th or 1/60th sec.) setting controls your ability to stop/freeze or blur motion. A high shutter speed like 1/500th of a second will freeze the movement or action of your subject in most cases. A slow shutter speed like 1/30th of a second or slower will blur the image of a moving subject. Your camera’s f:stop or aperture (ex: f:22 or f:2.8) controls the amount depth of focus or depth of field in your photograph.   f:22, which is a very tiny opening or aperture, will give your image near maximum depth of focus. An aperture like f:2.8, which is a large opening or aperture, will give your photograph a very shallow depth of focus or depth of field. If you think of the pupil of your eye, think of f:22 as the tiny opening your pupil becomes in the bright sun and f:2.8 as like your pupil very dilated or open in a dark room. The proper combination of Shutter Speed and F:Stop is what gives your photograph the correct exposure. If you are using your camera on automatic then your camera is setting these two values for you. If you want creative control over your camera and to impact how your final photograph looks you must understand and learn to use the shutter speed and f:stop effectively.That is the purpose of this four-part photo assignment. To make you smarter than your camera. To help you to better understand shutter speed and f:stop and how it affects your final image.


This W. Eugene Smith portrait (above) of Welsh miners shows great depth of field and foreground and background juxtaposition. The juxtaposition of foreground and background adds to the apparent depth and three-dimensionality of the photograph.

HOW-TO: SHALLOW DEPTH OF FOCUS

Use the Maximum (example f:2.8) f:stop/aperture available on your camera. You may do this by using the “A or Av” setting your your camera and setting the f:stop accordingly.

Use the TELEPHOTO setting of your lens to decrease your inherent depth of focus. 

Get CLOSE to your subject for a close camera to subject distance to further limit depth of focus.

In General, use a shutter speed equal to or higher than the focal length of your lens to help eliminate camera movement in your photos. For example: if you are shooting with a 50mm lens set your shutter speed to 1/60th of a second or higher.

This is because too slow of a shutter speed may also affect the apparent focus. If you choose to set your camera to a slow shutter speed this may blur your image and allow subject or camera motion to interfere with the sharpness of your photo.

If you are using a point and shoot camera or an entry level SLR with inexpensive lens  it likely has what is known as a variable f:stop lens. Look on the front of the lens and it should have printed there the focal length range and the f:stop range. A Canon G10 has a 6.1-30.5mm 1:2.8-4.5 lens.

That means the focal length of the zoom starts at the wide-angle focal length of 6.1mm and zooms to a short telephoto focal length of 30.5mm. The f:stop of the lens starts at f:2.8 at the wide angle setting of 6.1mm but as you zoom the lens toward 30.5mm the f:stop changes to f:4.5. (this example is for a G10, the numbers may be different on your camera)

Basically, as you zoom you need more light (slower shutter speed) to compensate for the change in f:stop because as the lens zooms the aperture gets smaller and lets in less light.

Variable f:stop is not a desirable feature but it does enable camera companies to make cameras and lenses much more affordable. Generally, professional lenses will maintain the same f:stop throughout the zoom range of the lens but this is not the case with less expensive lenses. If you are using a point and shoot camera your maximum aperture will probably only be available to when the focal length of your lens is zoomed out to widest angle.


Assignment Notes: Shallow depth of focus is sometimes difficult to achieve with point and shoot cameras. Get close to your subject and zoom your lens to telephoto to exaggerate the shallow depth of focus effect. You likely won’t be shooting at your maximum aperture any longer but that’s OK because of the effect that lens focal length has on depth of field. The focal length of the lens also affects depth of field/focus. A telephoto lens will have much less depth of field than a wide-angle lens because of the compression inherent in telephoto lenses.


Turn in: Put the two contrasting images on a new document and add background,layer effects, title and photo credit.

MOTION ASSIGNMENT


This is a two-picture photo assignment, one photo uses a fast shutter speed to stop or freeze motion,  the second uses a slow shutter speed to show motion in the image.  Make two images that show how fast and slow shutter speeds affect moving objects or people in a photograph.


DEPTH PHOTO 1-- GREATEST DEPTH OF FOCUS

DEPTH PHOTO 2- SHALLOW DEPTH OF FOCUS


An example of shallow depth of field in a portrait.  Notice how the eyes are sharp and the background is out of focus.     This helps focus your viewers attention on the subject while eliminating a distracting background. This effect was achieved by using a wide-open f:stop (f:2.8) a Telephoto lens and a close camera to subject distance.


Wedding photographer Neil van Niekerk used a fast shutter speed to freeze this bridal party in mid-air.

It’s important to pick an appropriate subject and situation for this assignment. In other words shoot something that you can tell is in motion. People in the air, water moving, someone or something in motion.


This photo of skateboarder Shaun White was taken in 2008 when he was in Houston to dedicate the Jamail Skate Park near downtown.


This is an example of a situation where the subject’s actions clearly show he is in motion.


©2008

Richard Carson

MOTION PHOTO 1- STOP MOTION


Set your shutter speed to 1/500th or higher so that you are able to “stop” or freeze” the motion or action in the photo. You may need to set your camera’s ISO rating to a higher setting such as 400, 800, 1600 or higher especially indoors or in low light.

Camera note: If you have an “S”  (Shutter Priority) or “TV” (Time Value) setting on your camera you may be able to use this feature to choose your shutter speed and have the camera automatically set the appropriate f:stop for a correct exposure.

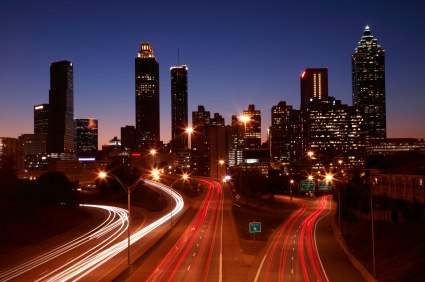
An example of a blur motion photo might be a photo of downtown buildings at night taken on a tripod where the headlights and tail lights of the cars create light streaks in the photo.

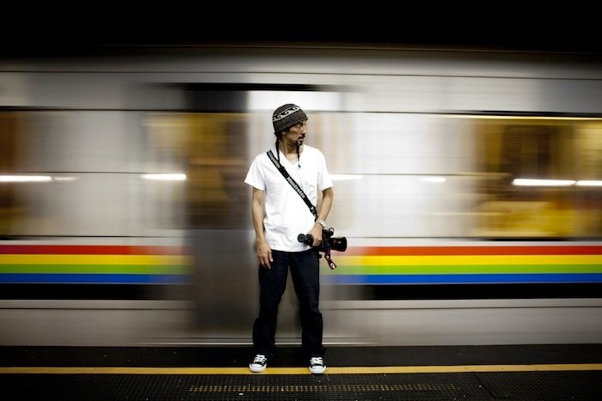
In this photo the subject is stationary while the subway car in the background is in motion due to the slow shutter speed. The photographer could have used a tripod but with a wide angle lens and a shutter speed of 1/10th or 1/15th of a second its possible to hand hold the camera for a shot like this.

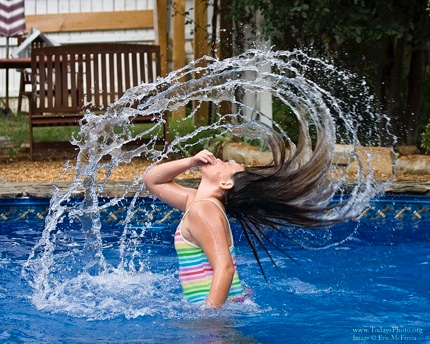
Here a fast shutter speed such as 1/500th or 1/1000th or higher was used to get this aquatic stop-action photo in the pool.

Here a slow shutter speed was used to give the moving water an ethereal or dreamy look to enhance this landscape photo. Sometimes a “neutral density” or “polarizing” filter may be needed to get a slow enough shutter speed on a bright sunny day.

Notice how by panning in the direction the subject travels they remain somewhat sharp while the background appears streaked due to the use of a slow shutter speed and motion blur.

Sometimes the easiest way to make a

pan-action photo is to be at the center of a moving object.


This photo shot from the center of a

merry-go-round makes it easy to focus on the subject and get a motion-blurred background.